What do you call a kid who doesn’t believe in Santa?
A rebel without a Claus.
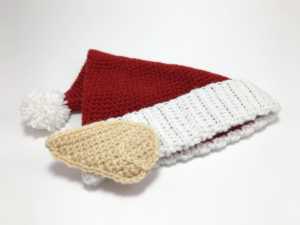
For this pattern I decided to stray from amigurumi and thought making a hat would be pretty fun. It’s a bit longer of a pattern, but can still be made in just a couple of hours!
The Materials:
•The Yarn (Medium Weight)
– Main Color (Red)
– White (Brim / Pom-Pom)
* Skin Tone (Button-on Ears)
•Size I9/5.50mm Hook
•Needle
* White 1” Buttons (For ears)
* = Things you’ll only need if you’re making Elf Ears to add to the side. This pattern requires a Club Crochet Membership to access. Learn more here: http://www.clubcrochet.com/elfears
Gauge: 3 Rnds and 3 sts per 1”
Worked in the round
The Stitches:
– Ch : Chain stitch
– St : Stitch
– Sl.st : Slip Stitch
– Sc : Single Crochet
– Hdc : Half-Double Crochet
– Inc : Increase
– FLO : Front Loops Only
– BLO : Back Loops Only

– The Pattern Part 1 –
Time codes below, ex: (7:47), pertain to the time codes on the Part 1 Video
Main Section:
[Starting in Main Color]
Ch 2 or use magic loop method
(1:48) Rnd 1: Work 6 sc in 2nd ch from hook or into magic loop (6)
(2:48) Rnd 2: [sc 1, inc] repeat 3 times (9)
(4:15) Rnd 3: [sc 2, inc] repeat 3 times (12)
(5:21) Rnd 4 – 5: sc in each st (12 x 2)
(6:43) Rnd 6: [sc 1, inc] repeat 6 times (18)
(7:47) Rnd 7 – 8: sc in each st (18 x 2)
(8:07) Rnd 9: [sc 2, inc] repeat 6 times (24)
(9:10) Rnd 10 – 11: sc in each st (24 x 2)
(11:08) Rnd 12: [sc 3, inc] repeat 6 times (30)
(12:45) Rnd 13 – 14: sc in each st (30 x 2)
(13:00) Rnd 15: [sc 4, inc] repeat 6 times (36)
(13:48) Rnd 16 – 18: sc in each st (36 x 3)
(15:07) Rnd 19: [sc 5, inc] repeat 6 times (42)
(17:31) Rnd 20 – 22: sc in each st (42 x 3)
(17:50) Rnd 23: [sc 6, inc] repeat 6 times (48)
(20:16) Rnd 24 – 26: sc in each st (48 x 3)
(20:45) Rnd 27: [sc 7, inc] repeat 6 times (54)
(21:45) Rnd 28 – 30: sc in each st (54 x 3)
(22:21) Rnd 31: [sc 8, inc] repeat 6 times (60)
Skip to Rnd N for size Extra Small
(24:55) Rnd 32 – 34: sc in each st (60 x 3)
(26:16) Rnd 35: [sc 9, inc] repeat 6 times (66)
Skip to Rnd N for size Small
(28:34) Rnd 36 – 38: sc in each st (66 x 3)
(29:21) Rnd 39: [sc 10, inc] repeat 6 times (72)
Skip toRnd N for size Medium
Rnd 40 – 42: sc in each st (72 x 3)
Rnd 43: [sc 11, inc] repeat 6 times (78)
Skip to Rnd N for size Large
Rnd 44 – 46: sc in each st (78 x 3)
Rnd 47: [sc 12, inc] repeat 6 times (84)
Skip to Rnd N for size Extra Large

(31:29) Rnd N:
This Rnd will be the length of the hat and it’s size depends on what size you made and personal preference. I personally like my length to be 12 Rnds. It should reach just above your ear lobes when worn.
Rnd N: sc in each st around (? x ?)
Repeat Rnd N to desired length (I made 12 Rnds)
(34:45) If you’re adding the Button-on Elf Ears [See page 6] sew on buttons where your ears are when the hat is on your head.
– The Pattern Part 2 –
Time codes below, ex: (7:47), pertain to the time codes on the Part 2 Video
Brim:
[Change to White]
Ch 14 (or to desired length for the brim +2)
(03:17) Row 1: Skip the first 2 chs, hdc in each ch down stoping 1 ch before the end. Using the last ch and the connecting st on the rim (the last st from Rnd N), sc2tog. (Pic 1)
This means you pull 1 loop through the ch, then pull a loop through the rim st, then yarn over and pull through all 3 loops on the hook.
Finish Row 1 by sl.st into the next 3 sts on the rim (Pic 2)


(05:24) Row 2: Turn, don’t ch, skip the 3 sl.sts, Working in the BLO, hdc in each st up (12)
(07:56) Row 3: Turn, ch 2, Working in the BLO, hdc in each st down stoping 1 st early
Using the bar above the final st (Pic 3) and the connecting st on the rim, sc2tog. (Pic 4)
Finish Row 3 by sl.st into the next 3 sts on the rim.


(09:57) Row 4: Turn, don’t ch, skip the 3 sl.sts, Working in the BLO, hdc in each st up (12)
Repeat Rows 3 and 4 around until you reach the beginning chs.
(14:00) For Button Holes (for adding elf ears only):
When you reach a button, ch 1 and skip a stitch. Button holes should go 4 sts above the rim.
For example, if your button lies on a Row 3 repeat…
Turn, ch 2, Working in the BLO, hdc in each st down stoping 4 sts early (for me that’s 8 hdcs), ch 1, skip a st, then continue as normal.
If your button lies on a Row 4 repeat…
Turn, don’t ch, skip the 3 sl.sts, Working in the BLO, hdc 3, ch 1, skip a st, then continue as normal.
(18:06) Brim finishing:
When you reach the end (you should be just finished with your 3 sl.sts) pull your crochet hook out, place your crochet hook into the 1st ch you made before Row 1, pull your loop through.
Working in the BLO, hdc in each st up stoping after each st to pull your crochet hook out, place it in the next ch, and pulling your loop through.
When you get to the top, ch 1, cut and pull through. Hide the end in the seam down.


(23:30) Pom-Pom:
Hold the yarn in your palm with your thumb in between your index and middle fingers.
Begin wrapping the yarn around your two fingers.
Wrap the yarn many times around. The more you wrap it the more dense your pom pom will be.
Cut the yarn and place the newly cut end into the gap between your hand and the wrapped yarn.
Wrap the pulled through yarn around the outside and through the gap again 2 more times.
Pull tight and remove the yarn from the fingers. Double knot the ends and tie it tight.
Cut the loops. Make sure all the loops are cut.
Trim the pom pom so that the ends are even and it’s more of a sphere.
Now begin sewing the pom pom onto the top of the beanie.
Double knot the ends on the inside and cut them close.
You can hide these ends in, but it’s not necessary.
– Part 3 –
Probably my favorite part about the Santa Hat pattern are the button-on Elf Ears you can make and add to the side of your Santa Hat! And you can remove them at any time so you’re not stuck as Santa’s helper forever.
This part of the pattern is a Club Crochet Exclusive meaning that you’ll need a membership to access the pattern. You can learn more about the other benefits of a membership and upgrade you’re account here!
This tutorial is brought to you by…
• Monthly patterns and projects
• Full video tutorials for each pattern
• Access to the Club Crochet Library
• Kits mailed directly to your door with all the materials to make one of that months patterns.



1 comment on “Santa Hat Pattern”